Intro : Creating a 3D effect with image editing software (GIMP or Photoshop)
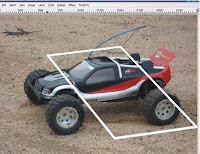
I will be demonstrating the technique with a picture of my RC truck, a Traxxas Rustler. For the unfamiliar, this truck isn't one of the cheap-o toys you get at Wally-World for $50. Its a hobby-grade RC from a company called Traxxas. "Hobby-grade" means its built to be completely user serviceable and upgradeable. They are also available with either electric motors or nitro engines (think top fuel dragsters). The body you see on it is one that I painted myself. RC makes a great hobby, and I'd recommend it to anyone. You can get some budget-minded models for as little as $130, or get a high-end model that might cost upwards of $700. Regardless, its a very fun hobby.
But I'm getting sidetracked, on to the instructable!

Step 2 : Set up your layers


Right click on the layer with the photo, and select "Add layer mask". In the dialog box that comes up, select "White (full opacity)".
Start by tracing around the frame and the part of the subject outside the frame with the pencil tool, with the color set to black (remember the rules! black makes the image invisible). With most tools, you can hold shift to create straight lines, which helps a lot when doing the rough cut and the frame.
Please note that my background is gray because I have already filled it in with gray color. When you create the layer mask, the background will show through wherever you make your main image invisible by painting black. So in my case, you see the gray background. If you haven't colored your background, you'll probably see white.
Now that the subject and frame are completely outlined, fill the background black (this makes that area of the main image invisible). Once you have a rough outline, zoom in real close and take the layer mask right up to the edge of the subject.
For this task, I used the paintbrush tool with a "fuzzy brush" (look in the brush selection box) to make a slightly blurry edge on the subject. Be sure to zoom in (- or the magnifying glass in the toolbox) super close to get all the details right.
Once you are happy with your layer mask, right click on it in the layers list, and select "Apply layer mask".


Here's how to make a neat effect to make it look like the subject of a photo is popping out of the background. This can be done with GIMP (GNU Image Manipulation Program) or Photoshop.
I use GIMP because it is a free open source program with just about all the features and capabilities of Photoshop, and is easy to use. Because I use GIMP, all the menu directions and screen shots will be GIMP specific. However, Photoshop is set up very close to the way GIMP is, so it shouldn't be to hard to find the right tools. If someone wants to post the Photoshop menu directions in the comments, I'll edit them in.
GIMP for Windows is available here. (Unix and Mac versions are in the sidebar)
Step 1 : Get a good base photo
A good base photo will have a prominent subject with strong lines, strong perspective, and an uncluttered background. You should also use as high a resolution image as possible.
This image doesn't have super strong perspective, but if you look at my other images, you'll see that an image with strong perspective works best.
This image doesn't have super strong perspective, but if you look at my other images, you'll see that an image with strong perspective works best.
I will be demonstrating the technique with a picture of my RC truck, a Traxxas Rustler. For the unfamiliar, this truck isn't one of the cheap-o toys you get at Wally-World for $50. Its a hobby-grade RC from a company called Traxxas. "Hobby-grade" means its built to be completely user serviceable and upgradeable. They are also available with either electric motors or nitro engines (think top fuel dragsters). The body you see on it is one that I painted myself. RC makes a great hobby, and I'd recommend it to anyone. You can get some budget-minded models for as little as $130, or get a high-end model that might cost upwards of $700. Regardless, its a very fun hobby.
But I'm getting sidetracked, on to the instructable!

Step 2 : Set up your layers
Open up a new, blank image with the same dimensions as your base photo. Make this layer whatever color you want your background to be. (I chose gray) Alternately, you could use a pattern or another image as your background. Next, open the base photo as a layer. Doing it this way makes it easier to work with, since you can't move anything behind the background layer created when you open up an image. You'll see why its important to have the original photo in the second layer soon. Finally, create a new transparent layer for the frame.

Step 3 : Make the frame
Create a rectangular selection about the same size as your subject on the transparent top layer. Fill it white with the bucket fill tool Shrink the selection (Select>Shrink) by about 50 pixels, more or less depending on the size of you picture. Cut out the center (Ctrl-x) You now have a frame.

Step 4 : Distort the perspective of the frame
Now use the perspective tool (either from the toolbox or Tools>Transform Tools>Perspective) to distort the frame's perspective so it matches the subject. When using the perspective tool, simply click and drag the corners to adjust the perspective.

step 5Create the layer mask
In this step, we will be using a layer mask, something a first timer (or even a regular user!) may not be familiar with. Layer masks allow you to easily cover the parts of the layer you don't want to show. There's only two rules that you really need to know about layer masks:
White makes the image visible
Black makes the image invisible.
Remember, layer masks don't alter the image until you apply them, so you can go back and forth, and experiment with covering or showing stuff until its just right.
White makes the image visible
Black makes the image invisible.
Remember, layer masks don't alter the image until you apply them, so you can go back and forth, and experiment with covering or showing stuff until its just right.
Right click on the layer with the photo, and select "Add layer mask". In the dialog box that comes up, select "White (full opacity)".
Start by tracing around the frame and the part of the subject outside the frame with the pencil tool, with the color set to black (remember the rules! black makes the image invisible). With most tools, you can hold shift to create straight lines, which helps a lot when doing the rough cut and the frame.
Please note that my background is gray because I have already filled it in with gray color. When you create the layer mask, the background will show through wherever you make your main image invisible by painting black. So in my case, you see the gray background. If you haven't colored your background, you'll probably see white.
Now that the subject and frame are completely outlined, fill the background black (this makes that area of the main image invisible). Once you have a rough outline, zoom in real close and take the layer mask right up to the edge of the subject.
For this task, I used the paintbrush tool with a "fuzzy brush" (look in the brush selection box) to make a slightly blurry edge on the subject. Be sure to zoom in (- or the magnifying glass in the toolbox) super close to get all the details right.
Once you are happy with your layer mask, right click on it in the layers list, and select "Apply layer mask".

Step 6 : Put the frame behind the subject
Now, turn the opacity of you frame layer down to about 50. This will allow you to see exactly where your subject goes underneath the frame. Erase any part of the frame that hides the subject, and use the blur and smudge tools to smooth the edges where the frame meets the subject.

Step 7 : Add shadows
Now its time to add shadows. The way I do it is with the airbrush tool set to about 60-70% opacity, working on the background layer so that the shadows will be behind everything. Just paint along two edges of the frame, trying to match as best you can the lighting from the original photo. Next, add shadows to the subject outside the frame in the same way. When you doing this, it helps to have the original photo open so you can refer to it as you paint.

Step 8 : Show it off!
There you go! You subject is now popping out of the picture! This technique can be applied to many subjects with excellent results. Try adding you own variations, such as multiple frames, patterns or photos in the background, etc. The possibilities are endless.


ithu kolaam
ReplyDelete